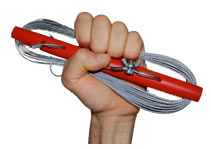
Home | Order | How To | Videos | Contact Us   cornices and backcountrybomb logo

Learn how to cut a snow cornice using the BackcountryBomb toolbomb tool

Snow cornice cutting just got a lot easier using the BackcountryBomb tool! Backcountry skiers and snowboarders, snow avalanche forecasters, professional ski guides and heli-ski guides, and professional ski patrol have been cutting and dropping cornices for a long time in the backcountry, now, with the BackcountryBomb tool they are able to drop an icy, dense snow cornice with more efficiency than before.

It's as good as snow cornice cutting gets without explosives!

Cornice cutting basics using the BackcountryBomb tool (one-person method):

  • Start small. Practice cutting smaller cornices before moving on to larger ones with more severe consequences.

  • Look below. NEVER (absolutely crucial!) Never perform a snow cornice test if you think there may be other travelers below or you can't see 30 degrees in either direction of the fall line, dropped cornices have unpredictable paths down slope and may produce very large avalanches.

  • Rope up. Cornices commonly break off farther back from where you think they will and can break at anytime unexpectedly. Approach the cornice attempting to remain on solid ground if possible, if not, remain as far back from the cornice as possible.

  • Poke around. Use your avalanche probe pole to poke around through cornices to find the edge of solid ground and to locate hidden rocks, branches, or other buried treasures that wire cable may become hooked on.

  • Clip it. Uncoil the wire cable and clip one end of the wire cable to your extended avalanche probe. Watch our BackcountryBomb instructional video for the recommended way to coil and uncoil the wire cable for best use and to avoid unwanted cable twists and kinks. You should now be holding a BackcountryBomb handle in one hand and the avalanche probe in the other hand.

  • Whip it. Keeping the wire cable in front of you, use a casting motion and attempt to whip the BackcountryBomb wire cable around the cornice to effectively "lasso" it. It is helpful if your ski partner is standing on solid ground in a position to see the entire cornice, your ski partner can help to verbally guide you into situating the wire cable around the cornice allowing you to remain farther back from the cornice.

  • Snip it. Once the wire cable is in place around the cornice, bring the avalanche probe back to you and unclip the probe to retrieve the other handle. Now, you are holding a handle in each hand and no part of the tool is behind you or wrapped around a body part (keep your hands on the handles, never on the cable or inside a cable loop). Then, keep a hold of the handles and walk backwards or sideways away from the cornice using a sawing motion to cut the cornice at the steepest angle possible.

Tips for using the BackcountryBomb tool

The Rub n' Tug - Be aware, dense cornices may unexpectedly tug on the wire cable while dropping, this is normal, keep a firm grip on the handles (never put hands on the wire cable or inside wire cable loops), if the force is too great, let go of the handles.

The Human Backcountry Bomb - Be sure to avoid becoming a human backcountry bomb by never allowing the wire cable or any part of the BackcountryBomb tool to be behind you.

The Snag - If the wire cable becomes stuck, stop to avoid fraying the wire cable. Then, if possible, try changing directions on the cut, it may be that you're caught in ice/rock and changing directions will release the wire. If all else fails, use the wing nut release to remove a handle allowing you to pull the wire cable through the cornice (don't try to pull a handle through the cornice.) Re-assemble and try again. Hint: a leatherman type tool helps!

The Fray - If you regularly have to remove the handle, over time, the cable will fray and it will become impossible to thread the cable back thorough the nylon sleeve and handle. To repair the frayed cable end, simply clip off an inch or two of the frayed end and carefully feed it back through the nylon sleeve and handle, then, tighten the wing nut on the releasable bolt and tape off the end with duct tape (or similar).

More, Bigger, Better - In an attempt to have one large release as opposed to having several smaller premature releases, try cutting 1/3 of the cornice in one direction and then, change directions to cut the rest of the cornice. This tactic is especially helpful when cutting non-overhung cornices.

BackcountryBomb Snow Cornice Cutting Tool Instructional Videos

Watch & Learn how to cut snow cornices using the BackcountryBomb tool, the backcountry skiers new best friend!

Proper winding is essential; a properly wound BackcountryBomb Tool allows for easy unfurling and prevents kinks in the cutting wire.


Home | Order | How To | Videos | Contact Usblue box

Warning  Dropping a snow cornice in a "cornice test" is an excellent way of testing slope snow pack stability, however, it is potentially dangerous and hazardous. Information presented here is not a guideline for when, where or how to conduct a cornice test.  Cornice tests should be done in conjunction with a full avalanche assessment and by persons trained in avalanche safety. Take an avalanche safety course, know how to use your avalanche safety equipment, test your skills and equipment and learn more about performing a cornice test. Persons using the BackcountryBomb tool in any manner, assume all risks and responsibility for any and all damages and injury (including death.)

info@backcountrybomb.com   |    site © 2014 BackcountryBomb   |   site design by Rip It Up Chick! Designs